![]()
Oxy-Acetylene Welding
Setting Up
1. Secure the tanks in an upright position.
They must be upright because the acetylene, which is unstable by itself
under high pressures, is buried in acetone, and boils out of the liquid as it is
used. The tank must be upright to prevent getting the saturated acetone into
your regulator, hose or torch. The
tanks must be adequately secured, because if they fall over in use, the valves
can break off, resulting in the released balloon effect - not a good thing.
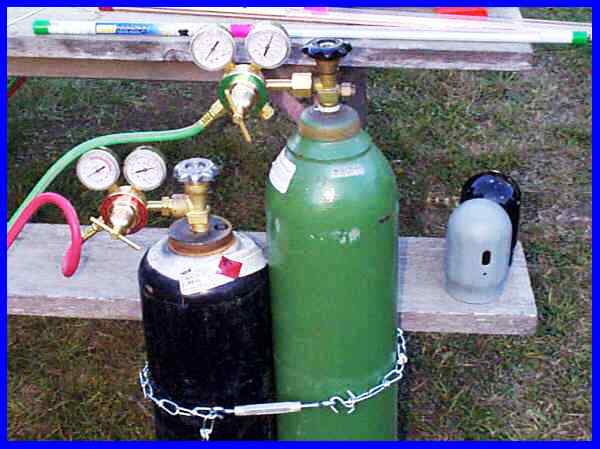
Note the strong chain with turnbuckle for this temporary setup.
2. Make sure a charged fire extinguisher is nearby.
Clear flammable materials away from your work area.
Check that your clothing is fire-safe.
The materials should not be very flammable, you should avoid long loose
sleeves or baggy clothing. Tie long hair securely out of the way.
3. Make sure you are working in a well-ventilated area.
4. Remove the protective caps from the tops of the tanks (after the tanks are secured). Normally, the caps are screwed on hand tight. If you can't remove them easily, use a chain wrench (not the bicycle kind - the plumber's kind), or lightly tap on the sides of the caps with a rubber mallet. If that doesn't work, take the offending tank back to the welding shop, and they'll help you out. Do not risk breaking the valve inside when removing a stuck cap.
5. Wear clear safety goggles for the next several steps.
6. 'Crack' the valves.
This means slightly open each valve for just a split second. Any dirt
that would otherwise be blown into the sensitive regulators will be discharged.
If you open them too far, the released gas can be quite loud, so
protective ear wear can be a good idea also.
7. Look for traces of oil or grease around the tank
valves. If someone has oiled the
valves, you don't want those tanks. Oil
anywhere in your welding system is not a good thing. Take the tanks back to the welding store for a free
replacement. While you're at it,
look over the rest of your torch set for signs of grease or oil.
If you find any, ask your welding store people what you should do to
correct the situation.
8. Firmly attach the regulators. Note that the acetylene
regulator's attachment uses left-threading. In welding equipment, 'gas' (as
opposed to oxygen) fittings are usually left-threaded.
However, if you use a Bernzomatic mapp gas/oxygen kit, it's the oxygen
fitting that's left-threaded.
9. Attach the hoses.
10. Screw the regulator controls out until they turn
quite freely. This takes pressure
off the diaphragms and springs, which helps protect the regulators from the
sudden application of pressure when the main tank valves are opened.
11. Open the oxygen tank main valve approximately 1/4
turn. Turn the regulator control in (clockwise) until you hear oxygen hissing
through the hose. If there is any
dust in the hose, this will blow it out. Unscrew
the control again, and turn off the oxygen tank main valve.
Do the same with the acetylene, keeping in mind that acetylene gas is
flammable. Do not release acetylene
gas near open flames or anything that can spark.
The acetylene regulator must never be turned beyond 15
PSI. Large volumes of acetylene,
such as in a welding hose, are unstable beyond that pressure.
That's why acetylene is buried in acetone within the acetylene tank.
12. Attach
the torch handle to the hose. Lightly
close the torch handle knobs. You
never want to overtighten these, because overtightening will crease the valve
seats making it hard to adjust flow rates.
13. Make sure the oxygen regulator control is unscrewed.
Open the oxygen tank valve 1/4 turn.
(Some people say it is better to open the oxygen tank valve fully,
because there is a second seal to control pressure when the valve is fully open,
but I think having it 1/4 turn open makes it easier to shut off in an
emergency.) Screw in the oxygen regulator until the pressure gauge indicates 5
pounds per square inch (PSI). Open the torch oxygen valve (green hose) for
several seconds, to fill the hose with oxygen and wash out any plain air that's
in the hose. Close the torch oxygen valve, but leave the tank open and the
regulator set.
14. Open the acetylene valve 1/4 turn.
(Never open this one more than needed, because it's the acetylene valve
that you'd close first in an emergency.) Screw in the regulator control until
the gauge indicates 5 PSI. Purge
the acetylene hose in the same way for several seconds, remembering that pure,
flammable acetylene will flow out of the torch.
Close the acetylene knob on the torch.

Acetylene regulator set to 5 PSI, Note the red line past 15 PSI
15. Get some soapy water - the kind that makes suds.
Coat sudsy water on all the connections on your torch set, and check for
leaks. No leaks are allowed.
If you have a leak that you can't fix by reattaching the offending parts,
check with your welding store people about how to proceed. If you have a leak
and try to fix it by attaching the parts very tightly, you are taking several
risks. Your equipment could break, or the leak could come back. Very tight
attachment is not required for a welding set in good condition.
A little safety tip: One of the most common mistakes welders make is to forget something is hot during or after welding. A good habit to form is to touch everything lightly and quickly a few times before picking it up. This way, you'll say "ouch" instead of getting a serious burn. With practice, you'll start picking up pens, eating utensils, and other everyday things with little tentative touches first. It might look silly, but it is a very useful habit.
![]()
![]()
Oxy-Acetylene Welding Main Menu
Tell a Friend About BikeWebSite
Please feel free to link your web pages to www.bikewebsite.com - Thanks!
![]()
Copyright © 1991-2014, bikewebsite.com