"Save Big With Bicycle Discount Coupon Codes"
Bicycle Tires And Tubes
Bicycle Tire And Tube Removal From The Wheel
Let all remaining air out of the bicycle's tire.
First, try removing the bicycle's tire without the use of tools. Set the bicycle wheel on the floor with the valve at the three o'clock or nine o'clock position. Grab the top of the tire in one hand, and try to pull it sideways, over the top of the rim. With fat tire bicycles this is generally quite easy. With thin tire bicycles, you may find it nearly impossible.
If you cannot remove the tire without tools, use a couple of tire levers if you have them, or the backs of some forks or spoons. Try to avoid using sharp screwdrivers. Start by inserting one tire lever anywhere between the tire and the edge of the rim. Insert the lever just far enough to pry the edge of the tire over the edge of the rim.
It is very easy to poke a hole into the bicycles inner tube.
After prying the edge of the tire over, insert one more tire lever about four inches (10 cm) from the first one and pry a little more tire over the edge of the rim. Take out this second lever and re-insert it another four inches away and pry over the edge of the tire again here. Soon the whole side of the tire will be loose enough to finish prying over by hand.
Pull the inner tube out of the way and finish by prying the other side of the tire off the rim.
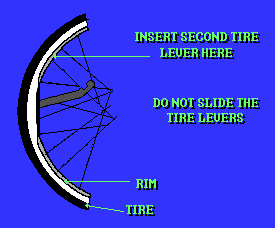
If necessary, carefully insert the tire levers at several locations.
![]()
Three Ways To Fix A Bicycle Flat
There are three ways to fix a bicycle flat tire. You can replace the whole inner tube, which is more reliable than another way, patching it. Patching is cheaper, the patch kit is easier to carry than a whole tube and you will have more than one patch, in case you have another flat.
The third way is the easiest. There are various liquids and foams that you can squirt into the inner tube through the valve. They seal leaks by clogging them up. Sealants can be put into your tires before you have a puncture, as a preventive measure. But they have less than a fifty percent success rate. Sealants are at their best in cases of numerous small punctures, such as running over areas where thorn bushes grow. They seldom work with large holes.
Patching The Bicycle Tube
Put lots of air into the tube until it is twice its regular size. The hole should be noticeable by now, but if not, you can put the whole tube under water and look for bubbles coming out. If the hole is small, you can mark it by poking through the hole with a screwdriver to make it larger.
Unless you have glueless patches, follow this procedure exactly:
1. Deflate and make sure the outside of the tube is dry.
2. Using sandpaper, or the metal scraper that comes with some patch kits, buff the tube around the area of the hole to remove the outer surface of the rubber revealing fresh rubber underneath. Make sure to buff at least as large an area as the whole patch will cover. If you use a metal scraper, be careful not to cut deep enough to create new holes.
3. Put glue over the buffed area. Work only in a well-ventilated area.
4. Let the glue dry fully. Really! This kind of glue, also called contact cement, must dry completely before applying the patch. Many people are confused about this and do strange things including setting the glue on fire!
5. Peel the foil or the plastic backing off the patch and press it firmly on the glued area. Do not touch the side of the patch which sticks to the glue because even the microscopic amount of material on your fingers deactivates its stickiness.
![]()
Installing The Bicycles Tire And Tube
1. Check the rimstrip, the rubber, cloth or plastic covering over the spoke nipples to be sure it is in good condition and in proper position.
2. Look at the outside of the tire while feeling around the inside (carefully) to see whether the puncturing object is still stuck in the rubber.
If the tire has a large hole, you may be able to shore it up temporarily. Just lay a square of cloth between the tire and the tube. The air pressure will hold it in place.
3. Pump just enough air into the tube for it to take its doughnut-like shape.
4. Put the inner tube fully into the tire.
5. Push the valve about half way into the valve hole on the rim. If you have trouble getting it in, lift up the rimstrip first, push the valve through the rimstrip, then into the rim.
6. Lay the wheel on a table and then slip the bottom side of the tire into position onto the rim.
The last little bit may be difficult to slip over the edge of the rim. Resist the temptation to use a tire lever to pry it on.
This may damage the tire edge, or you may slip and put a hole in the tube. It is almost always possible to get the tire on entirely by hand if you force just an inch or two at a time over the rim using your thumbs. Practice helps more than strength. Except with a few thin tires, almost no strength is needed.
7. Now put the top side of the tire on the same way. If you have trouble, make sure there is not too much air in the inner tube. Also check to see that the tire goes on properly. Sometimes the tire won't drop fully into position on the rim, often near the valve. This is why you put the valve half-way into its hole at first, to help prevent the tube getting caught between the tire and the rim edge.
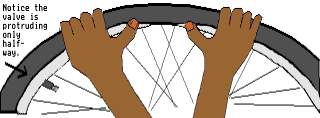
Getting the last portion of the tire over the rim.
8. When the tire is installed, gently pull and wiggle the valve stem into position.
9. Put just a little air into the bicycle's tire, about ten pounds per square inch. Look at the tire, all the way around and on both sides, to be sure it is seated properly. If there is a section of tire that is trying to bulge off the rim, let the air out and fix this area by pushing it into position. After you are satisfied with the tire installation, inflate the tire to full pressure. Do this slowly, periodically checking that the seating is still OK. The proper pressure is written (vulcanized) on the tire side.
Another seating problem is the opposite of bulging. The tire will not seem to fill up entirely in one area, giving you a wheel with a sort of flat spot. Sometimes this can be cured by letting the air out, manipulating the tire by hand into place, and then re-inflating. Sometimes you have to do more. One approach is to coat the edges of the rim with soapy water to lubricate the tire and rim, allowing the tire to slip into position as you inflate it. Use a kind of soap that dries up. Some mechanics just exceed the recommended pressure for a short while until the tire pops into position, but this is dangerous. In some cases, a new tire is necessary.
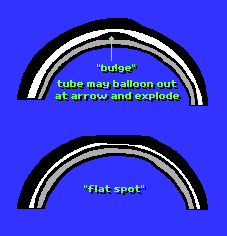
Note: Bicycle repair people are not all agreed on this procedure. Some use other techniques. If someone shows you another approach, it may be just as valid as long as it works. Choose the one you like best.
![]()
3 Things You Need To KnowBefore You Buy
Next - Installing A Front Wheel
Tell a Friend About BicycleWebSite
Please feel free to link your web pages to www.bicyclewebsite.com.
![]()
Copyright © 1991-2014, bikewebsite.com