![]()
"Save Big With Bicycle Discount Coupon Codes"
Building Bicycle Wheels I
The reasons you might want to replace all the spokes in a bicycle wheel, called building a wheel, or lacing, include replacing a rim, hub, or the spokes. Some enthusiasts even disassemble their wheels so they can clean the parts, and then rebuild the wheels. If you are building a bicycle wheel to replace the rim, good news: Here's a shortcut.
If your bicycle's wheel has broken one or more spokes at the hub, the spokes might be fatigued, and they will all need to be replaced.
![]()
To build a bicycle wheel, follow these steps:
1. Get new spokes if you can. Old ones can be used if they are not fatigued. If you plan on reusing the spokes from a rear wheel, when you disassemble the bicycle's wheel, segregate the spokes into two piles, the spokes that attached to the right side hub flange, and those that attached to the left. Some rear wheels are built with slightly different length spokes between the right and left sides to better accommodate the wheel's dish. If reusing spokes, notice how many other spokes each spoke crosses. Most wheels are built with a 3 or 4-cross pattern, and the spoke lengths will vary, so you'll have to know which pattern to use.
1a. If using new spokes, make sure you have the right length spokes for the wheel. You might find this spoke chart helpful.
2. If you plan on reusing the bicycle's rim, disassemble the wheel in stages. Do not loosen each spoke all the way, working your way around the wheel, because this is likely to warp the rim. Instead, go around the wheel several times, loosening every spoke a turn or so at a time, until they are all loose, then you can fully remove the spokes.
3. If reusing any old parts, clean them as much as you like before building the wheel, because the parts are so much easier to clean than when they are assembled.
4. Look at the spoke holes in the rim, and see if they are offset from the center. Some are, some aren't.

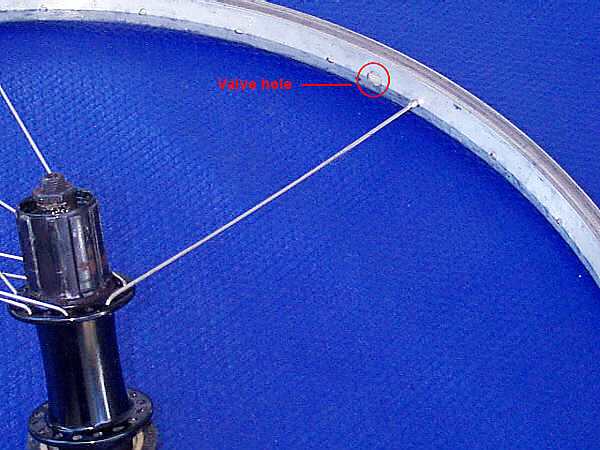
5. Lay the bicycle's rim on a table with the valve hole at the top or 12 o'clock position. Just to visualize step 6, hold the hub in the middle of the rim. If it is a rear wheel, hold the hub with the sprocket side up.
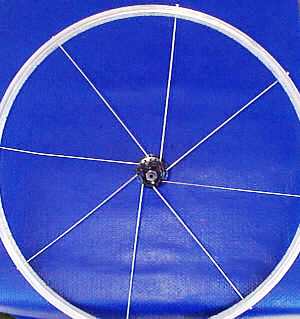
6. Bicycle wheels always have multiples of four spokes. 36-spoke wheels are the most common. We'll look at wheel spoking patterns as having four parts, the spokes that come over the top of the top flange, the spokes that come out of the underside of the top flange, the spokes that come from the inside of the bottom flange, and the spokes that come from the outside of the bottom hub flange. So, if we have a 32-spoke wheel, each group will be eight spokes. We'll install these four groups, one at a time.
In this example, we'll be building a rear wheel. Front wheels are easier, because you can ignore the direction-specific details.
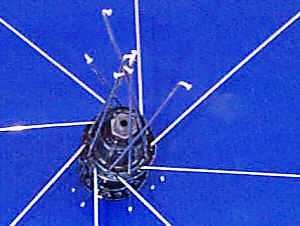
7. We'll start with the 'pulling' spokes, in the case of a rear wheel. Put a spoke in every other spoke hole in the sprocket (right) flange of the hub. Drop the spokes in from the inside of the hub, so that they'll fold over the outside of the hub flange.
Note that on some hubs, every other spoke hole on the outside of the hub flange is countersunk, meaning that the hole is has rounded edges. You might think that the countersinking is to accommodate the head of the spoke. But there's a better reason for countersinking. It's to better support the bend of the spoke. When the bend of the spoke is pressed against a sharp edge, over time, it can break, so the edge is rounded. So, on those hubs in which only every other hole is countersunk, fill the holes that are countersunk on the outside with this first set of spokes.
8. Look at the first spoke hole to the right (clockwise) of the valve hole. If this is an 'up' hole, above the centerline of the rim, this is the first spoke hole to which we'll attach a spoke. If it is below the centerline, select the next hole clockwise. Grab any spoke, and attach it to the rim with a spoke nipple, screwed on three or four turns.
9. Attach the next spoke clockwise on the hub to the fourth hole clockwise on the rim.
10. Continue around the rim until the entire first group of spokes is attached. At this point, the spokes will seem way too long.
11. Twist the hub clockwise, the same way the sprocket would turn the hub. Notice that the spokes you have just installed are the most critical group. They carry the torque (twisting power) from the hub to the rim. These are the pulling spokes.
12. Put the next group of spokes into the same hub flange, but facing the other way. Drop these in from the outside of the flange, so they will curve against the inside of the flange.
13. Grab any one of this second group of spokes, and cross it under two if you're building a three-cross pattern, or under three spokes if your building four-cross, and over one. By crossing over the last spoke, you're creating a wheel that's "interlaced." This gives the wheel slightly greater lateral strength.
How do you know if it is three-cross or four-cross? That is determined by the length of the spokes. If you're using old spokes, when you took the old bicycle wheel apart, you noted the number of crossings, didn't you? If not, this spoke length chart should tell you the number of crossings.
Connect the spoke into the hole half-way between the last spoke it crossed over, and the next spoke clockwise.
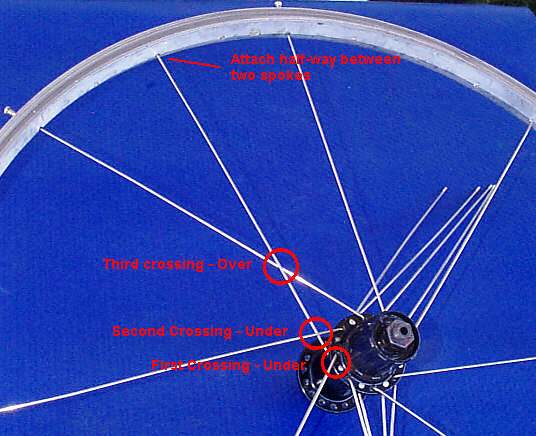
This is a three-cross pattern, so the spoke crosses under two, and over one.
Be careful about scratching the rim as you're installing spokes, especially if it is color anodized.
14. Connect the rest of this group of spokes in the same way, remembering to cross over the last spoke in each case. Loosely attach the spoke nipples, screwing them on three or four turns. At this point, you may think the spokes are too short. This happens because the spoke nipples' bottom edges catch in the spoke holes in the rim. You may need to wiggle or press the spoke nipples into position.
15. Half of the bicycle's spokes are installed. Flip the wheel over, and look at it directly from the side. You'll see that the holes in the unfilled hub flange fall exactly half-way between the holes in the filled hub flange. You might conclude that the last groups of spokes copy the first groups, but are a half-hole rotated in the hub, and one-hole rotated in the same direction at the rim. You would be exactly right. But, let's look at another way, to understand more clearly.
Continue To Building Bicycle Wheels II
3 Things You Need To KnowBefore You Buy
![]()
Tell a Friend About BicycleWebSite
![]()
Please feel free to link your web pages to www.bicyclewebsite.com.
![]()
Copyright © 1991-2014, bikewebsite.com