![]()
"Save Big With Bicycle Discount Coupon Codes"
Suspension Basics
|
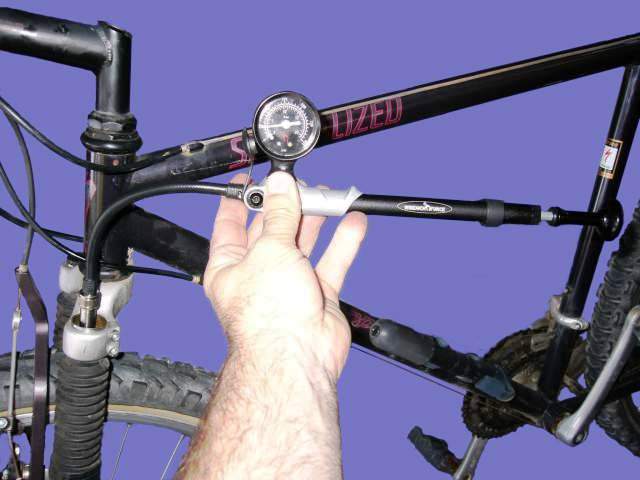
Many modern bicycles come with suspension components. Suspension is more than a way to make the ride more comfortable. It helps maintain better control in severe off-road riding. It protects the bicycle. By flexing, the wheels are much less likely to be damaged when hitting sharp edges in the road. And, suspension adds a degree of safety, especially front suspension. When hitting a tree root, curb, or similar sharp obstruction, a bicycle without suspension can stop suddenly, introducing the rider to flight. With suspension, the rider may curse a bit, but will remain seated and under control. Finally, suspension can make some riding more efficient. The rider can remain firmly seated, rather than hovering slightly over the seat to let the bicycle rock over bumps. Staying an inch above the seat can be a waste of energy. We have seen an evolution of suspension systems on bicycles during the past 20 years or so, sometimes resulting in some very ingenious variations. Because of the degree of variation, these instructions may not apply to your bicycle, or may need some modification. Be sure you understand and can perform these steps properly before attempting something that could mess up your bicycle's suspension adjustment. Some are simply springs built into the fork blades and sometimes mounted between the main part of the bicycle frame and the rear wheel assembly. Some of the more interesting variations are a rubber ball that's compressed between parts of the frame when the rear wheel hits bumps, and a telescopic seat post that you can buy to add suspension to any bicycle. Plain spring suspension seldom has any damping effect. Damping is a way to slow down the spring action, so you don't inefficiently bounce up and down after hitting bumps. Bicycles with damping generally use oil or air, moving through small holes inside the mechanisms to slow down the spring effect. Damping is often adjustable. Bicycles that use oil for damping may require that you change the amount or viscosity of the oil to change the damping. Bicycles that use air for damping often also use the air for the spring effect. The air is contained within the fork blades, or in the rear shock under pressure. Too much air will be too bumpy, and not enough air will be too soft. A typical better quality suspension fork will have two kinds of adjusters. You can turn a tension adjuster at the top of each fork tube to control how high the bicycle rides. On the bottom of each fork tube is another knob that you can turn to control the damping. Bicycles with suspension should be adjusted to accommodate the rider's weight and riding style. A good place to start is to set up the bicycle to compress about twenty percent of the suspension's full travel when the rider is just sitting on the bicycle. On many bicycles, you can temporarily install a tie wrap around the inner part of one fork tube. Push the tie-wrap down until it is sitting on the fatter part of the fork tube. Sit slowly on the bicycle, and you'll see that the tie wrap moves up as the suspension compresses. When you get off the bicycle, you can measure the distance the tie-wrap moved up the tube. That's how much the fork compresses under your weight. Sometimes you can use the same technique with the rear shock absorber. Suspension systems that use air are almost always adjustable by changing the air pressure within the chambers. Some of these have regular air fittings, just like the valves on your car tires. Others have special valves similar to basketballs, in which you insert a needle. In a pinch you can use an ordinary tire pump or air compressor to adjust air suspension, but you may find it very difficult to control the pressure of such a small amount of compressed air. Also, most tire pumps and air compressors are not capable of the higher pressures some suspension systems require. It is easier to use a special suspension pump, also known as a "fork pump." These cost around $40 and are available at bicycle shops.
An air suspension system can hold the pressure for quite a while, but as the bicycle wears, the seals may start to leak, and you may have to adjust the air pressures more frequently. Sometimes you can get replacement seals and overhaul your suspension system. But sometimes, replacement seals are unavailable. Oil suspension systems may also leak in time, not only necessitating refilling the oil, but making a mess as well. You'll find that many air suspension forks also have a bit of oil in them for lubrication or damping that can also start to leak. Most suspension forks can be dissassembled, cleaned and overhauled. Because there are many types of forks, the following information is only general. 1. Remove the front wheel. 2. Remove the front brake, and the bridge piece that holds the brake and keeps the fork tubes parallel. 3. You may find removable plastic caps in the tops or bottoms of the fork tubes that can be carefully pried out with a screwdriver. 4. You may find allen (hex) head bolts in the tops or bottoms of the fork tubes. Unscrew these, and you may be able to pull the forks apart. 4a. Or, you may find a C-clip in the top of the fatter portion of the fork tube. Carefully remove the C-clip with a pin tool if you have one. It can be done (carefully) with a small screwdriver and needlenose pliers, but you must have a high tolerance for frustration if you do it that way. 5. Pull the fork tube apart slowly, keeping it in an upright position. This is in case there is oil in the fork. If so, it can spray all over the place if you pull the fork apart too quickly. Keep track of the amount of oil, and replace with the same amount if the seals have not been leaking. Otherwise, consult the manufacturer's specifications for the amount of oil to use. 6. Clean forks carefully, because left over dirt or corrosion can quickly ruin the seals. 7. Reassemble and adjust, making sure that the fork tubes are set to the same height. Put all the bolts in loosely at first, so that you can put them all in without struggle and without damaging the threads, then tighten them all when assembly is complete. Note that many of the screws thread directly into cast aluminum alloy, which is easily damaged. Put a little grease on the screw threads if you ride in adverse wet conditions so that a couple of years later, you'll still be able to remove the screws. 8. Make sure that the front brake is adjusted properly after a fork overhaul.
|
|
This was contributed by Len, a BicycleWebSite reader: Most shock absorbers use a combination of springs and a damping mechanism. The damping force keeps the spring from bouncing up and down several times, but allows it to travel. There are three damping methods used; air under pressure, hydraulic fluid, and friction. My shocks were frozen, and use friction damping. In order to take the shocks apart, I removed the screws holding the brake arch to the fork, and the brake mounting screws, and then the bolts at the bottom of the unit, just above the dropouts. This allowed the outer tube to move freely with respect to the slider. Well, sort of. Since they were frozen due to rust, I needed to use a rubber mallet to separate the two parts. Once apart, it was a simple matter to clean up the rust, remove any old lube, water and dirt, then lubricate everything and reassemble. While a bit messy, it was really quite simple to do. My fork now has suspension travel again! |
|
Bent Dropouts How's it going Jeff. I'm 15 and ride mountain, road, and BMX bicycles. I have built all of my bicycles from parts around the house or that I bought online. My BMX bicycle is a custom with 20 inch wheels, 45-16 gearing ratio, (basically standard) and BENT DROPOUTS. I don't know how to fix this problem, and I don't want to spend a bunch of money getting the Park Tools drop-out-fixing-miracle-thing. Any tips or tricks on how to repair the dropouts would be greatly appreciated. - Gary
Hi Gary,
You can generally bend dropouts back with a big
adjustable wrench. Be careful not to bend more than you need. With aluminum
bicycles, be especially careful, since aluminum will easily crack. To see when
they are straight, you can take the rear axles out of two rear hubs (maybe
from junked wheels), and set them up so that they are held in the dropouts by
their locknuts in about the middle of the axles, so that the inside ends of
the axles almost touch in the middle of the frame. Misalignment will be very
obvious since the axles won't ponit at each other.
Have fun!
- Jeff -
|
![]()
3 Things You Need To KnowBefore You Buy
![]()
![]()
![]()
Back - Install Adjust 3 Speed Wheels
Next - Install Rear Wheel On Derailleur Equipped Bicycles
Tell a Friend About BicycleWebSite
Please feel free to link your web pages to www.bicyclewebsite.com.
![]()
Copyright © 1991-2014, bikewebsite.com