![]()
"Save Big With Bicycle Discount Coupon Codes"
Building Bicycle Wheels II
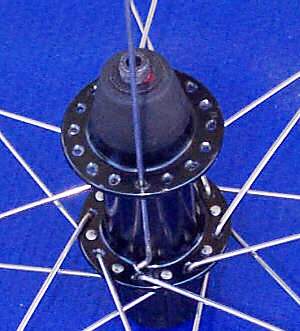
Do you see that the holes on the top flange are exactly a half-hole between those on the bottom?
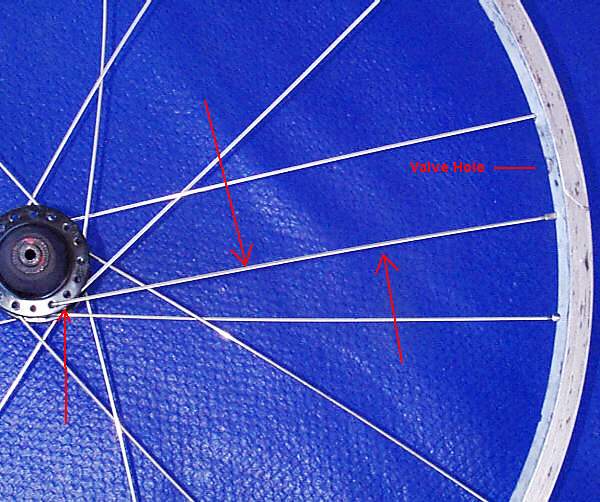
Find the open spoke hole on the bicycle rim that's closest to the valve hole. Trace the spoke next to that hole back to the hub. If the spoke you're tracing is clockwise from the empty spoke hole, place a spoke in the hole in the empty flange on the hub that's 1/2 hole counterclockwise from the spoke your tracing. Or, if the closest one to the valve hole is clockwise, then trace it back to the hub, and find the hole in the opposite flange that's offset one-half hole counterclockwise. Put a spoke in the hole on the flange that comes from the underside of the hub flange, and bends over the top of the flange. Attach it to the empty hole next to the valve hole on the rim.
16. One at a time, fill every other hole in the top hub flange, and connect the bicycle's spoke into every fourth hole on the rim in the same way. You are essentially copying the lower group of spokes that comes from the inside of the lower hub flange, but the top set is going to be offset by one-half hole clockwise or counterclockwise.
Three of the four groups are installed.
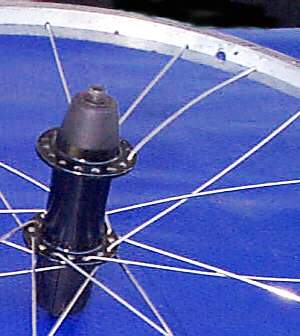
17. Install the last group of spokes one at a time. Put each spoke into the flange from the outside, sliding it in among the spokes, but outside of the innermost crossing, so that you can curve it around, and bring it through the spoke pattern. Be careful to avoid scratching the rim, and try not to bend the spoke more than necessary. Chrome-plated spokes, especially, don't like to be bent. The chrome plating cracks when bent, and the spokes can then rust. Cross each spoke under two or three, depending on whether you have a three-cross or four-cross wheel, and over the last, just like you did on the first side, and screw a spoke nipple on three or four turns.
18. Whew, all the spokes are in! Starting at the valve hole, go around the bicycle's wheel, and tighten each spoke nipple until it just covers the visible threads on its spoke. Now, although the spokes are still loose, they are all adjusted to nearly the same length.
18a. If this is a rear wheel on which the hub flanges are offset to the left to make room for the freewheel, the spokes on the right must be tightened more than the ones on the left. This will center the rim over the whole hub, not over the flanges of the hub. This is called dishing. Start at the valve hole, and tighten each spoke nipple that's attached to the right hub flange (every other spoke) three turns. The wheel is dished, although it may not be dished correctly. We'll get back to that later.
19. Starting at the valve hole, go around the wheel and tighten every spoke nipple one turn. Go around and around as many times as necessary, until most or all the spokes tighten up. How tight is properly tight? You may want to sample the spoke tensions on other wheels. Take your spoke wrench to a bicycle shop and ask if you can turn a few spokes on their junkers to see what the right tension feels like. Lightly tighten any spoke nipples that are still loose.
20. Straighten ("true") the wheel in the usual way (discussed here).
20a. If you have a rear wheel with offset hub flanges, check the dish. You may need to loosen every other spoke nipple - every spoke going to one hub flange - one turn, and tighten the in-between spokes, the ones going to the other hub flange, one turn. Make sure to start each revolution at the valve hole so you know when you're done. If you have a dishing gauge you can check the dish easily. This is a long bow that lays against the rim, and has an indicator that can be adjusted to touch the hub. When you flip the wheel over, and set the dishing gauge against the other side, its indicator should just touch the hub in the same way. If not, adjust the dish.
If you don't have a dishing gauge, you can put the wheel in the bicycle, and see if it is centered between the chainstays and brake pads. Flip the wheel over, and it should be centered the same way when the dish is adjusted correctly.
After dishing, you may need to align the wheel again.
21. Pre-stress the wheel. Lay it on a table, and put your hands at 9 and 3 o'clock on the rim. Lean firmly but not with all your weight against the rim. You may hear some twinkly noises. This is the spokes settling into the hub flanges, and the spoke nipples settling into the rim. While they are settling, they may also be unwinding, since aligning wheels usually twists the spokes a bit. Turn the wheel all around, an eighth-turn at a time, and lean on it each time, until you don't hear the sounds anymore. Some wheels won't make any twinkling sounds, and that's just fine. They either don't need pre-stressing, or do it silently.
22. Align the wheel one more time, install it on the bicycle, ride away, and have a good time!
22a. If you want to do a super-professional job, then after ten miles (16km) and again after 100 miles (160km) , check the spoke tension, and readjust the alignment if necessary.
![]()
Some Notes About Bicycle Wheelbuilding
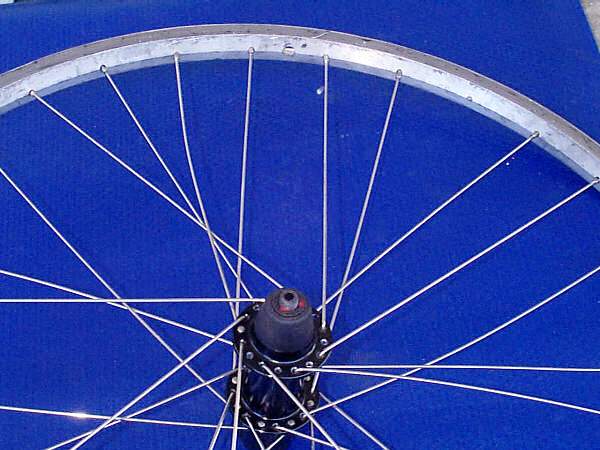
A. You'll notice that if you build a bicycle wheel as per the example above, the spokes nearest the valve hole cross away, giving the most access to the valve.
B. The example pictured above is a three-cross, 32-spoke wheel. There are other patterns, such as radial spoking (no crosses), mixed patterns in which the spokes on the right side of the wheel are different than those on the left, and multi-layer artistic spoking. Once you understand the basic pattern, the variations are easy to understand.
C. If you have trouble understanding one of the steps in wheelbuilding, you can take your partially-built wheel to a bicycle shop and ask for a bit of help. Most bicycle shops are glad to help out with serious requests, and often at no cost.
3 Things You Need To KnowBefore You Buy
![]()
Tell a Friend About BicycleWebSite
Please feel free to link your web pages to www.bicyclewebsite.com.
![]()
Copyright © 1991-2014, bikewebsite.com